Unravelling Konami's Arcade DRM
It’s well known that Konami doesn’t have complex protection on its arcade systems. Programmed World was a fan-made network replacement and update service for Konami arcade games with no support outside of Japan. Nothing of its scale and quality had been seen before, and nothing has been seen since, despite other franchises on other systems having similarly impressive userbases. It existed for so many years, pushing day-1 data updates where no other system came close. Surely that means the crypto is simple? Well, it’s certainly not a walk in the park, but I’ve managed to completely reverse the system.
Background: I consider myself a proficient low-level programmer, but my reverse engineering skills leave a lot to be desired. However, I’m persistent! Despite my techniques being inefficient, it took me about 1.5 months to reverse Konami’s crypto, working in my spare time.
I’ll be focusing on two things for this adventure - my process in reversing the encryption, because by sharing my methods I may help others. Secondly, high level details of Konami’s dongle-based encryption, because it’s rare to find proper information on actual, in-the-wild implementations of USB dongle based security.
Oh, and before you get your hopes up - I couldn’t find any obvious flaws. As far as I can see, there is no way to decrypt data without the private keys stored in the dongle.
Let’s dive in!
Obtaining the hardware
First of all, how’d I get my system? For me, it’s not really a “system”… If you hang around Yahoo! Auctions and rhythm game communities, you’ll eventually see people selling game HDDs along with security dongles (a good start is searching YAJ for ドングル, Japanese for dongle). I waited a while and PM’d some people, and managed to score a Reflec Beat HDD+Dongle combo from 2011, and it only cost me $50!

Without the arcade machine attached, it might not boot far enough to decrypt the game. For $50 I was willing to take the risk.
Eventually they arrived:
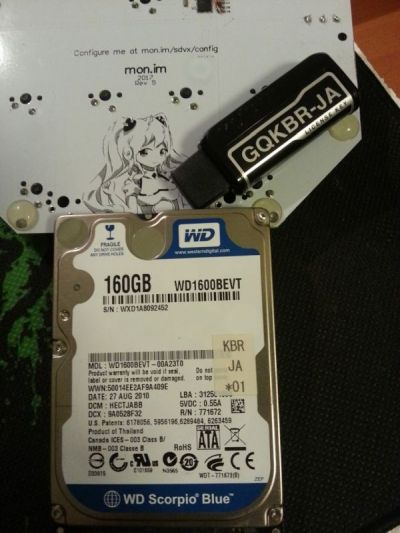
The dongle looked far too big for what it is, so I took a guess and pried open the outer shell:

Much easier to fit in my hub. An amusing note - the large shell says “Made in Japan”, the actual dongle is “Made in China”.
After making a HDD backup, what’s on it? Zanneth does a far better job explaining it here. Replace LDJ with KBR (Reflec Beat’s game code) and that’s essentially what’s on the drive.
Firing it up
Next, can I boot the game through a VM? Through a surprisingly laborious process of GParted and SATA->USB adapters, I got the game into a VMWare image. It boots!

And gets to a hardware error screen:

Presumably this is my lack of game IO. I couldn’t find anything remotely like this error in the unencrypted files, so I guessed it’s getting far enough to decrypt. A good fallback!
Running natively
However, I loathe Windows XP Embedded, even with remote debugging tools - running a VM seems so wasteful. Time to see if I can get it running on Windows 10!
By investigating the various startup .bats in the system, the magic happens inside bootstrap.exe, inside the game directory’s modules folder. It contains a few dlls, along with 9 (!) encrypted DLLs. Most of them all start with 0x00, then appear entirely random. Two have a different system - kdm.dll and kws.dll both have plaintext ‘test’ along with some structured data, but quickly turn random as well.

Decoding these headers is what we’re here for!
Bootstrap is given some file arguments - trustcerts.p7s and trustfiles.p7s. These are ASN.1 encoded certificates, with some extra encrypted binary data - a list of trusted system files and their MD5 hashes, to prevent tampering. It also gets a configuration xml (encrypted) and a configuration to run.
reflec> bootstrap.exe ..\prop\bootstrap.xml env_drm ..\prop\trustcerts.p7s ..\prop\trustfiles.p7s
M:boot: bootstrap 1.2.5  build at 2010-09-16 10:43:37+9
F:boot: Unable to initialize the ikey service.
Clearly this isn’t booting as far as Windows XP did. Time to fire up IDA, and holy debugging messages:
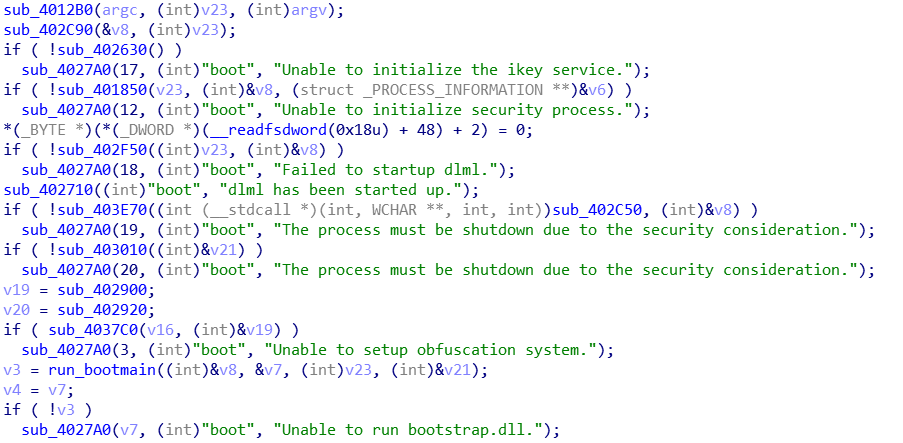
Throughout this project, my work was simplified by the thorough, plaintext debugging messages sprinkled judiciously through Konami’s code. I still had to reverse all the low-level details, but high level functionality was very easy to discern thanks to these error messages.
So, bypassing the ikey error… Going into the function, it appears to be restarting services related to the dongle, presumably to get a clean slate. I didn’t have dongle drivers yet, so I made the function return success.
M:boot: bootstrap 1.2.5  build at 2010-09-16 10:43:37+9
F:boot: Unable to initialize the pki world.
This error is thrown by a function called before the ikey initialiser, so what’s up? Seems like some sort of security check - I did just tamper with the exe, after all. On a whim, I used a combination of CreateProcess and WriteProcessMemory to patch the code in memory. I put in a pause to give me time to attach a debugger, and off we go~
Applied 1 patch
Press enter to continue...
M:boot: bootstrap 1.2.5  build at 2010-09-16 10:43:37+9
F:boot: Unable to initialize security process.
We got further, looking good! In the end I made 3 more patches - one to enable verbose logging (why this was left in is beyond me), and two to bypass signature checks the game loaded from trustfiles.p7s. They were easy to implement, since the game prints helpful messages when files fail validation.
A small debugging hiccup came in the form of kbd.exe (I think it’s short for Konami Bootstrap Debugger) - this file attaches a debugger to bootstrap.exe, which fails if I’m already debugging it. If kbd quits, so does bootstrap. As an experiment, I made the most basic replacement for it:
#include <stdio.h>
#include <windows.h>

int main() {
    printf("I:adb proxy launched\n");
    while(1)
        Sleep(10000);
    return 0;
}
This actually worked :D So, where do these patches get us?
E:boot: Unable to load bootstrap.dll: 0x00000003
F:boot: Unable to run bootstrap.dll.
A brick wall of missing files
0x03 is the Windows error code for ERROR_PATH_NOT_FOUND, so it’s time to fire up one of my favourite tools - Process Monitor. If you’ve never heard of it, it logs filesystem, registry, thread and some network activity. It captures a stackdump for every event, which is super useful in finding where files are loaded.
With Procmon, I can see bootstrap loading several encrypted DLLs along with (presumably) their system DLL dependencies. However, just before exiting, bootstrap fruitlessly checks my entire PATH for api-ms-win-core-processenvironment-l1-1-0.dll. It turns out this is a part of Microsoft’s new “API Sets” feature introduced in Windows 8. These are “virtual” DLLs, in that they don’t really exist on the filesystem, but LoadLibrary sorts them right out. For their DRM, Konami appears to have overwritten LoadLibrary with their own version, which breaks this system. This makes sense, as calling LoadLibrary on an encrypted DLL doesn’t return an error - it pops up a MessageBox, which is very programmer unfriendly.
This path filter needs patching, but it was beyond me at the time. Bootstrap already loads several encrypted DLLs, such as kbt, ltsme, and libavs-win32. We can ignore the path issues for the moment and get these DLLs decrypted. I took the CloseFile event for kbt.dll (the first DLL loaded), put a breakpoint in the function that calls it, and began my slow reversing process.
First stage decryption
So what do I know? I know the file has just been loaded. I know that all DLLs start with the magic characters “MZ”. So, I fired up Cheat Engine and searched for “MZ”. There were some libraries loaded, so I got 4 results. I then began stepping through the code after the CloseFile call. I then repeated the search. When another MZ appears in the list, I know the function I just stepped over performs decryption. I can then break on this function, restart the program, and repeat the process until I get to the meat of the algorithm.
This isn’t very efficient! To keep track of things, I also named functions as I drilled down. This results in quite a soup of names as I go deeper and deeper.
However, in the end I managed to work out this “stage 1” crypto. First, I found the function creating the first block of decrypted data. Cryptographic algorithms are very obvious in disassembly, because they’re full of bitshifts, XORs and other bitwise ops.
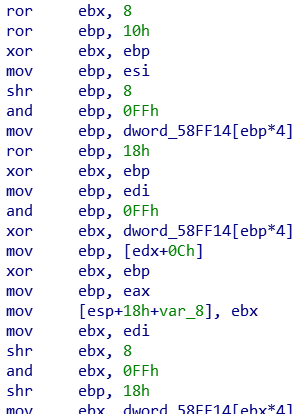
By looking at the constant arrays referenced in this code, I found AES constants. Alright, so we’re using AES! Moving back up the functions, I found the AES key and what appeared to be an IV. I could also see the first decrypted block inside the encrypted file, and it wasn’t at offset 0. Now I knew how long the header was. I made a quick Python script using PyCrypto, and attempted to decrypt kbt.dll. And it worked… almost. The first block was decrypted, but the rest was garbage. Moving back up, the IV was being modified in a very confusing way - it was split into 4 ints, then the last one was being mangled:
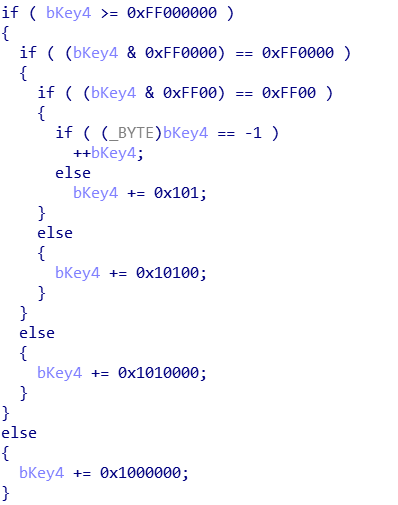
After 15 minutes spent trying to decipher this, I simply translated the code into Python and iterated infinitely. Turns out, this is how you perform big-endian addition without actually converting the number to little-endian. An odd way of doing it, but perhaps a compiler optimisation. It turns out they’re actually using AES_CTR, but instead of incrementing the entire counter IV, they’re only using the last 4 bytes. A little strange, but if your encrypted file is 232 * 16 bytes long, you have other problems to worry about.
The final step was to find how the encryption key was generated. For this, I repeated my “Cheat Engine binary search”(TM) method, waiting until keys popped into memory. This time I found even more RORs and ROLs along with XORs, and again some data tables - googling some constants, this was SHA1! So far, so good.
It turns out the encryption key comes from hashing parts of the file header, but I was missing something critical. The internal state in the SHA1 structure wasn’t matching the standard initialisation values (0x012345678 etc) plus the buffer was half-filled with a great deal of “PADDINGXXPADDING”, which is inserted into binaries by compilers. I could check what I knew so far, by finding a pure-Python SHA1 library and meddling with its internal state. I set it to the state I found, hashed the stuff I did know… and it gave me the right key! So it’s half solved, but where did this state come from?
Again I repeated the Cheat Engine technique, until I found this state in memory. I’ve probably restarted the game a few hundred times by now, it’s really not a fast way of doing things! This brought me to a very long function full of loops and conditionals making lots of calls to the hash function I encountered before. By inspecting the locations and sizes being passed in, I eventually realised the code was parsing the PE header of bootstrap.exe, and hashing individual sections! The “PADDINGXXPADDING” lives at the end of bootstrap.exe, which explains why it was left in the SHA1 buffer..
This is a very clever way to prevent tampering - if bootstrap.exe is modified, it can’t decrypt anything as the keys will be wrong! By reading up about the PE header, and thanks to the lovely pefile library, I finally got myself a standalone decryptor for “stage 1”. This includes kbt, kdu, kmp, libavs-win32 and ltsme, as well as the configuration files bootstrap.xml and avs-config.xml. It also worked on the binary blobs inside trustfiles/trustcerts, but the decrypted contents are an unknown binary format - all I could glean was the names of the trustfiles checked.
Second stage decryption
This left kdm and kws to reverse, and the game files of course. But before we start, time to look at our newly decrypted DLLs. Inspecting them, kbt is what the game refers to as bootstrap.dll, and actually executes the game. kdu probably stands for “Konami Dongle Utils” and communicates with the dongle drivers. kmp seems to be some sort of memory pool. libavs-win32 is a general purpose library containing a ton of filesystem, logging, memory management and utility functions.
ltsme.dll is a little more interesting - it’s structured far differently from all the k__ DLLs, and contains many strings referring to different crypto algorithms, as well as source file references for throwing errors. Googling these source files reveals it’s probably the RSA BSAFE library - certified implementations of many common cryptographic algorithms. This makes sense, as every Konami game I’ve seen has a splash screen proclaiming:
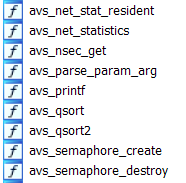
All of the k__ DLLs have their function exports obfuscated, of the pattern <dll_name>_<n> where n is the ordinal of the export (kdu_1, kdu_2 etc). Thanks again to Konami’s gratuitous debugging, a lot of these functions can have their names reversed anyway. libavs thankfully lacks this obfuscation, which makes it easy to see it’s a utility library:
The pesky path filter
Before we can load the remaining DLLs, it’s time to look back at the DLL loader’s conflicts with API sets. Thanks again to Process Monitor, I know the function that’s making the search:
 At first, I tried ignoring the conditonals and always returning success. However, the LoadLibrary replacement is recursive, and loads dependencies from the DLL it finds. By stubbing the function, I simply get null pointer dereferences. Naive! By moving only 2 functions up the call stack, I found my saviour, which in hindsight was very obvious.
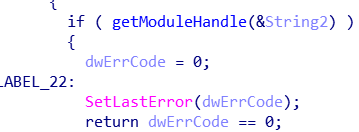
To avoid infinite recursion from circular dependencies, bootstrap checks to see if the module is loaded using GetModuleHandle. If I just force Windows DLLs to load using the real LoadLibrary, I’ll avoid the API set debacle. Time to test out some new skills and write a DLL injection library! There’s tons of literature on the web to teach this, and it didn’t take me very long to implement. Before running bootstrap, I save the real LoadLibrary before it’s tampered with, and hook GetModuleHandle to include my extra checks.
int WINAPI my_GetModuleHandleW(LPCWSTR lpModuleName) {
	auto ret = orig_GetModuleHandleW(lpModuleName);
	if (ret) {
		return ret;
	}
	printf("Loading module %ls\n", lpModuleName);
	if (wcsstr(lpModuleName, L"api-")) {
		printf("Windows library, preloading\n");
		orig_LoadLibraryW(lpModuleName);
	}
    // return newly loaded module
	return orig_GetModuleHandleW(lpModuleName);
}
Hacky, but it worked! Now where are we up to?
W:boot: Dongle is not connected.
I:boot: Entry loadlibrary (p7e)
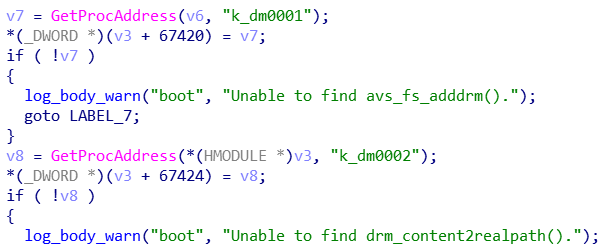
I:boot: DRM module is about to be loading.
W:boot: ERROR:don_manager_slot_license
W:boot: unable to load 'kdm.dll'
Ding dong(le)
Time to use the security dongle! First up, our prime suspect for analysis - kbt.dll. It initialises a lot of our newly decrypted libraries. Importantly, it has references to dongle driver DLLs (through kdu), so we install those drivers. The dongle is a Safenet iKey 2032, and can be treated as an encryption black box containing a secret key. The dongle library thankfully follows a well documented standard called PKCS11, which greatly simplifies login, decryption, and session management.
kbt calls kdu functions in so many places, and kdu calls dongle functions in so many places, that manually stepping through and finding calls is going to be a huge pain. I’ve just learnt how to inject DLLs and hook functions, so why not put this to good use? I looked at the imports of kdu, hooked all of the C_ functions that sounded interesting, and fired up bootstrap once again.
Thanks to my hooks, I could now print the return address every time a dongle function is called. I can also print the arguments and return values, which is incredibly useful. Hooking C_Login led me to the algorithm that generates the dongle PIN. By hooking C_Decrypt, I can print out the data that’s going to the dongle - this makes it super easy to cross-reference with what’s in the encrypted files. Hooks are great!
DONGLE: C_FindObjectsInit(session: 0x09850004, count: 3)
DONGLE: C_FindObjectsInit(session: 0x09850004, count: 3)
M:boot: watcher enabled
I:boot: don_manager_start_lib is running.
DONGLE: C_Login(session: 0x0E150006, u_type: 1, pin: 0xBFA7911976079F6B757A32D69BAA4671, pin_len: 16)
I know I could have used breakpoints with IDC/IDAPython to print information, but I really wanted to learn DLL injection and hooking. kbt.dll also switches from bootstrap.exe’s logging to functions provided by libavs-win32.dll. There is a debug flag to enable here too, so it’s easier to just inject.
When attempting dongle login, if you enter the incorrect password 10 times, the dongle will permanently lock you out. Luckily I didn’t find this by accident: the dongle drivers let you know how many attempts remain. One advantage of dynamic analysis meant that I could test my PIN generation algorithm, fail a few times, and run bootstrap.exe again to let the game perform a correct login. This is a useful safety net when failure results in a brick!
The dongle PIN turned out to be reasonably simple - a salt appended to some identifying info from the dongle, hashed with SHA1. To avoid errant null terminators from the hash, each successive \0 becomes \1, \2 etc etc… However, in newer versions of the dongle drivers these PINs aren’t always valid. The spec says they have to be UTF-8 encoded, and a SHA1 hash sure doesn’t guarantee this. I changed my dongle’s PIN to “helloworld” to perform some tests, but attempting to change it back resulted in an invalid length error. I had to boot up the old XP VM to change the PIN back, as it doesn’t care about bad characters.
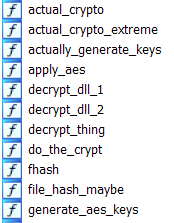
Ok, time to inspect kdm. Why kdm and not kws? Well…

Great function name obfuscation guys, really effective.
The hex dump of kdm.dll reminded me of the trustcerts file. Could it be ASN.1?
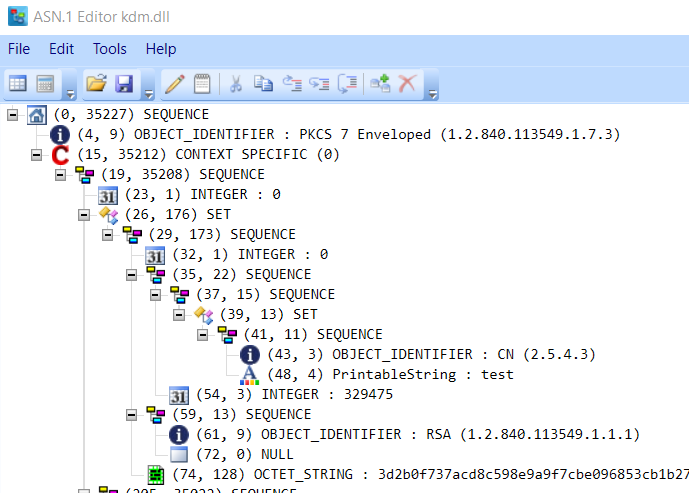
Brilliant! By hooking more C_* functions related to encryption, and cross referencing data with the ASN.1 dump, “stage 2” became 100% obvious. I never had to look at disassembly for this stage, because the dongle calls told the entire story.
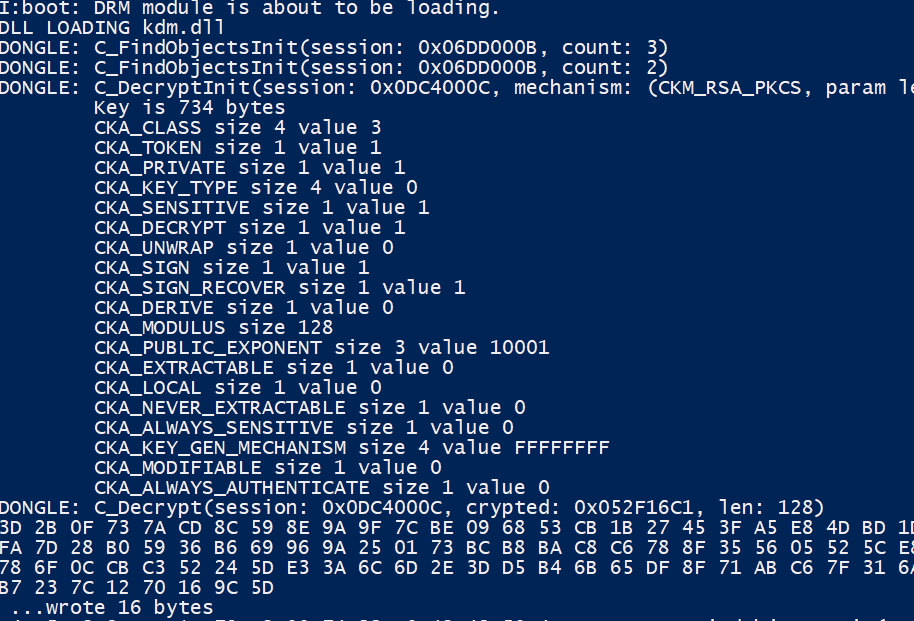
Both key and IV were extracted directly from the ASN.1 blob. The key was decrypted by the dongle and its private key (using RSA PKCS), then the pair were used with the dongle’s AES mechanism to decrypt the DLL. Oddly, the dongle’s AES is identical to standard AES, and I was able to perform the decryption on the PC side. Limited by USB 2.0, the dongle ends up slower, so I wonder why Konami chose to perform this decryption on the dongle. I guessed they will move to a more performant encryption for the real game, since those files are significantly larger. Read on to see if I was right :)
Final stage decryption
With kdm and kws decrypted, it’s time for the final frontier! Decryption of the actual game, not just the bootstrapping DLLs.
Konami’s extensive debug string usage was once again a huge help here - before I even started reversing specific functions I knew exactly what they should do. Wouldn’t every reverse engineer wish for something so nice?
Path obfuscation
The hardest part (for me) didn’t turn out to be the decryption, but the path obfuscation. The actual game files aren’t as conveniently named as the dlls in the modules folder.
KBR/contents$ tree
.
├── 0
│   ├── 1
│   │   ├── 1
│   │   │   ├── 5a7ddaa7bcaca08f81911ad290be72f9e14c1
│   │   │   └── 77c12c396141778ba39762dcda195807dc76b
│   │   └── f
│   │       └── be3ff2c203d690006af3a243f5e78f35d965a
│   ├── 2
│   │   ├── 1
│   │   │   └── d44f8e863315302ddb81868fa4338f16dcc0d
│   │   ├── 5
│   │   │   └── 07c708612ae712921e83cb2db48dcf0b709b0
│   │   └── 6
│   │       └── 814976b86d6913c97d615691cdf2db41545dd
│   ├── 4
│   │   ├── 5
│   │   │   └── 26445d335bcb0da2c2d72accdd3b119a46a30
│   │   └── b
│   │       └── db5f902601454b4c4863bab941647f994af7d
This continues for all 600 files in the game. The first file accessed (thanks again to Process Monitor) is eventually traced back to its “real” name: keyfile.dat. Sounds exciting! Through the slow Cheat Engine process, I found the function generating these paths:
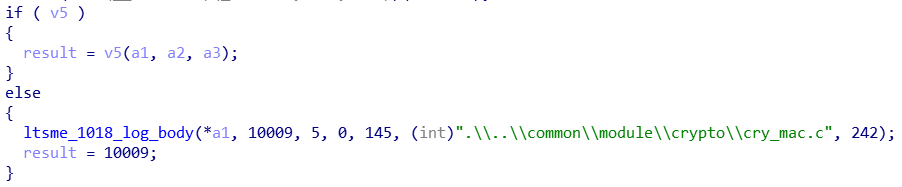
I googled this and discovered it was a MAC algorithm. The input was the real filepath, the key/hash/code was more dongle data and a salt. I then wasted many days trying to reverse exactly what this function was doing. I didn’t know anything about MAC, so I couldn’t reliably differentiate RSA’s boilerplate from the real deal. The entire library is dynamic functions and vtables, so static analysis is useless for me.
After much crying and gnashing of teeth I had a good night’s rest and looked back at the main function again. cry_mac.c. One proper search later, some more Python poking, and I realise that mac is short for _H_MAC. Boom - instant success. Lesson: You can step through code all you want, but do try and understand the basics.
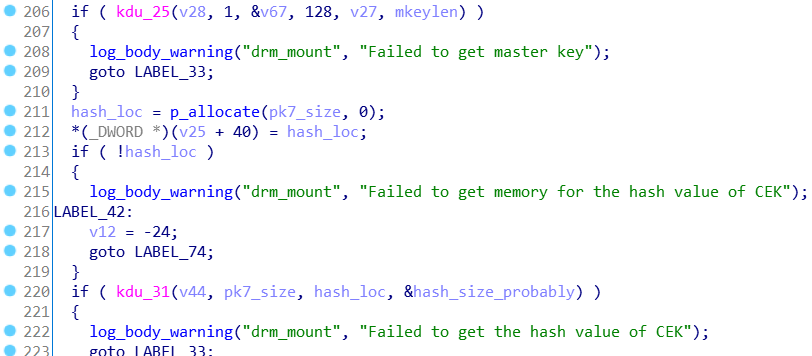
Keys to the kingdom
With path obfuscation solved, the very final step is probably the simplest work in this entire saga. The decryption functions are well commented with error messages, easy to follow, and consistent. The keyring was loaded into memory, so offsets into it are simple to understand. The reversing of this algorithm was quite basic compared to the rest, so I won’t go into detail. Instead, for (in my opinion) the most interesting information of all. How are the files encrypted?
The biggest surprise - to decrypt all the files in the entire game, only one call is made to the dongle. I guess at this point, decrypting files (or even multiple file keys) with the dongle would just slow the game down.
So, here’s the process:
- The keyfile contains the keys for the game. Every file has a different key.
- The “master key” is decrypted using the dongle.
- This master key changes with every single game update (I had some leftover update files on my HDD)
- This is why you always need a dongle!
- When a file is loaded, a key for that file is decrypted using the master key
- That key is then used to decrypt a second key
- THAT key is then used to decrypt the real file.
Phew! Crypto layers on crypto layers on crypto layers! The final question - how does the game know which file belongs to which key? The very first file decrypted, file.xml, contains a list of every file in the game, along with their key offsets:
<?xml version='1.0' encoding='UTF-8'?>
<fileinfo contents_code="KBR-001">
  <dir name="data">
    <dir name="graphics">
      <dir name="cardentry">
        <file name="card.bin">
          <key_idx __type="u32">1</key_idx>
          <orig_size __type="u32">6982428</orig_size>
          <dst_path __type="bin" __size="20">d2b50a2ae7d3392205ead278d70506d85ae9bee0</dst_path>
        </file>
      </dir>
Combining everything into a (now quite large) Python program, I can decrypt my game HDD for the 7 year old ReflecBeat.
> python .\decrypt_all.py 'D:\reflec\game\KBR\contents'
Successful dongle login
Keys loaded
File list loaded
data/graphics/cardentry/card.bin
data/graphics/cardentry/card_2.bin
data/graphics/caution/caution.bin
data/graphics/common/cmn.bin
data/graphics/common/loca_info.bin
data/graphics/common/paseli.bin
data/graphics/font/f0000.bin
data/graphics/gameover/gameover.bin
data/graphics/gameover/info.bin
...
...
What’s next?
With what I’ve learned, I’m confident in purchasing a real arcade cabinet. No arcades in my city have these games, and frequent trips to Japan become expensive ;). New games can’t run offline by default, so maybe I can write my own personal network server and buy a Sound Voltex cab to fawn over. Of course, this would be useless if Konami has changed their system in the last 7 years (very likely!). If I buy a cab and it’s got a new system, I guess you’ll see another blog post :)
I could also start writing emulation tools for ReflecBeat’s IO system and bypass the hardware error to get it playable on a touchscreen laptop. At this point, I don’t have the time. Perhaps a later date!
I hope you’ve enjoyed reading this as much as I enjoyed writing it! It’s been a fun ride.
Comments